What Do You Need to Do Acrylic Nails: A Complete Guide
Acrylic nails are a popular way to enhance your natural nails, offering durability, length, and a flawless canvas for creative designs. But achieving salon-quality acrylics at home or even understanding the process beforehand requires knowledge, the right tools, and careful technique. This comprehensive guide will walk you through everything you need to know and do to successfully apply and maintain acrylic nails, whether you’re a beginner or looking to refine your skills. We’ll cover essential supplies, step-by-step application, maintenance tips, and expert advice to ensure a beautiful and long-lasting manicure. Prepare to elevate your nail game with this in-depth resource.
Understanding Acrylic Nails: A Deep Dive
Acrylic nails are artificial nail enhancements made from a combination of a liquid monomer and a powder polymer. When these two are mixed, they form a moldable substance that hardens to create a strong, durable layer over the natural nail. This layer can then be shaped, filed, and decorated to achieve the desired look.
The History and Evolution of Acrylic Nails
The concept of artificial nails dates back centuries, but the modern acrylic nail as we know it emerged in the mid-20th century. Dentists are credited with pioneering the use of acrylic materials in nail enhancements, initially using dental acrylics to repair broken nails. Over time, the formulas were refined specifically for cosmetic use, leading to the development of the acrylic systems we use today.
Core Components: Monomer and Polymer
The liquid monomer, typically ethyl methacrylate (EMA), acts as a binding agent. The powder polymer, usually polymethyl methacrylate (PMMA), provides the structure and strength. The ratio of monomer to polymer is crucial for proper application and durability. Too much monomer can weaken the nail, while too little can make it difficult to work with.
Distinguishing Acrylics from Other Nail Enhancements
It’s essential to differentiate acrylics from other popular nail enhancements like gel nails and dip powder. Gel nails are cured under UV or LED light and offer a glossy finish, while dip powder involves dipping the nail into colored acrylic powder. Acrylics, on the other hand, require a liquid monomer for application and air-dry to a hard finish. Each system has its pros and cons in terms of durability, application, and removal.
Importance of Proper Application and Maintenance
The longevity and health of your natural nails depend heavily on proper application and maintenance. Incorrect application can lead to lifting, cracking, or even fungal infections. Regular maintenance, including fills and proper removal, is crucial to prevent damage and keep your acrylics looking their best. Recent studies have emphasized the importance of using reputable products and following sanitary practices to minimize risks.
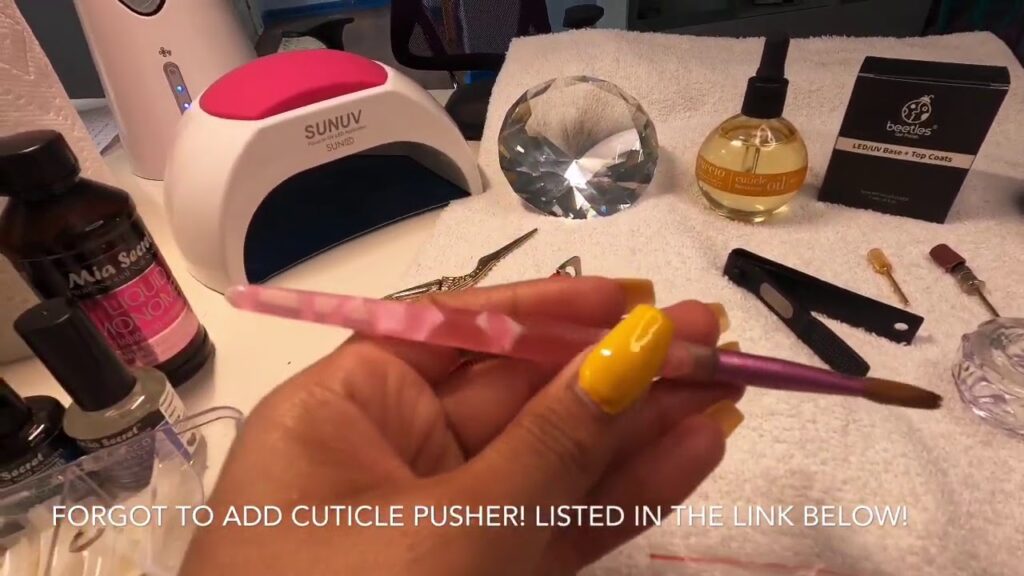
Essential Supplies: What You Need to Do Acrylic Nails Right
To successfully apply acrylic nails, you’ll need a specific set of tools and materials. Investing in quality supplies will not only make the process easier but also contribute to a better and longer-lasting result.
Monomer and Polymer Powder
As mentioned earlier, the monomer and polymer are the foundation of acrylic nails. Choose a reputable brand that offers a good balance of strength, flexibility, and color options. Consider a clear or natural-colored polymer for versatility.
Acrylic Nail Brush
A high-quality acrylic nail brush is essential for picking up the right amount of product and creating a smooth, even application. Look for a brush made of kolinsky sable hair, as it provides excellent control and durability. Size #8 is a good starting point for beginners.
Nail Primer
Nail primer helps to dehydrate the nail surface and improve adhesion. Acid-based primers are more effective but can be harsh on the skin, while acid-free primers are gentler. Choose a primer that suits your nail type and sensitivity.
Nail Tips or Forms
Nail tips are pre-shaped plastic extensions that are glued to the natural nail to add length. Nail forms are adhesive templates that are placed under the free edge of the natural nail to sculpt the acrylic extension. Choose the method that best suits your skill level and desired nail shape.
Nail Glue
For applying nail tips, you’ll need a strong and fast-drying nail glue. Opt for a glue specifically designed for artificial nails to ensure a secure bond.
Acrylic Nail Clippers
Acrylic nail clippers are used to trim and shape the acrylic extensions. They are sharper and more durable than regular nail clippers, allowing for precise cuts without cracking or splitting the acrylic.
Nail Files and Buffers
A variety of nail files and buffers are needed to shape, smooth, and refine the acrylic surface. Use a coarse grit file (80-100) for shaping, a medium grit file (180) for smoothing, and a fine grit buffer (240 or higher) for polishing.
Dappen Dish
A dappen dish is a small glass or ceramic container used to hold the liquid monomer. It prevents contamination and allows for easy access during application.
Cuticle Pusher and Nipper
Proper cuticle preparation is essential for preventing lifting and ensuring a clean application. Use a cuticle pusher to gently push back the cuticles and a cuticle nipper to trim any excess skin.
Sanitizing Solution
Maintaining a clean and sanitary workspace is crucial for preventing infections. Use a sanitizing solution to disinfect your tools and hands before and after each application.
Step-by-Step Application: Mastering the Acrylic Nail Technique
Applying acrylic nails can seem daunting at first, but with practice and patience, you can achieve professional-looking results. Follow these step-by-step instructions carefully:
1. Prepare Your Natural Nails
Begin by washing your hands thoroughly with soap and water. Push back the cuticles with a cuticle pusher and trim any excess skin with a cuticle nipper. Gently buff the surface of your natural nails to remove the shine and create a slightly rough texture for better adhesion. Cleanse your nails with alcohol or a nail dehydrator to remove any oils or residue.
2. Apply Nail Tips or Forms
If using nail tips, select the appropriate size for each nail and apply a small amount of nail glue to the tip’s well. Press the tip onto your natural nail, holding it firmly for a few seconds until the glue sets. Trim and shape the tips to your desired length and shape using acrylic nail clippers and a coarse grit file. If using nail forms, carefully apply them under the free edge of your natural nail, ensuring they are securely in place.
3. Mix the Acrylic
Pour a small amount of liquid monomer into a dappen dish. Dip your acrylic nail brush into the monomer, wiping off any excess liquid on the side of the dish. Then, dip the brush into the polymer powder, allowing a small bead to form on the tip. The consistency should be smooth and slightly runny, not too wet or too dry.
4. Apply the Acrylic
Apply the first bead of acrylic to the area where the nail tip meets your natural nail (or to the free edge if using forms). Gently pat and spread the acrylic, blending it seamlessly with your natural nail. Apply additional beads as needed to build the desired thickness and shape. Work quickly and efficiently, as the acrylic will start to harden within a few minutes.
5. Shape and Refine
Once the acrylic has hardened, use a coarse grit file to shape the nails to your desired form. Pay attention to the side walls, apex (the highest point of the nail), and cuticle area. Then, use a medium grit file to smooth out any imperfections and blend the acrylic seamlessly with the natural nail. Finish with a fine grit buffer to polish the surface and create a smooth, glossy finish.
6. Apply Nail Polish or Gel (Optional)
If desired, apply nail polish or gel to add color and design to your acrylic nails. Apply a base coat, two coats of your chosen color, and a top coat for a long-lasting finish. Cure gel polish under a UV or LED lamp according to the manufacturer’s instructions.
7. Finish with Cuticle Oil
Apply cuticle oil to the cuticles and surrounding skin to hydrate and nourish. This will help to prevent dryness and cracking and keep your acrylic nails looking their best.
Features Analysis: What Makes Acrylic Nails Stand Out
Acrylic nails offer several key features that contribute to their popularity and effectiveness as a nail enhancement option.
1. Durability and Strength
Acrylic nails are known for their exceptional durability and strength. The hardened acrylic layer provides a protective barrier over the natural nail, preventing breakage and splitting. This makes them ideal for individuals with weak or brittle nails or those who work with their hands frequently.
2. Customizable Length and Shape
Acrylic nails allow for complete customization of length and shape. You can choose from a variety of nail tips or forms to create the desired extension and then file and shape the acrylic to achieve your perfect look. This versatility makes them suitable for a wide range of nail styles and preferences.
3. Versatile Design Options
Acrylic nails provide a smooth and even canvas for a wide range of nail designs. You can apply regular nail polish, gel polish, acrylic paint, or even embed decorative elements like glitter, rhinestones, or charms. The possibilities are endless, allowing you to express your creativity and personal style.
4. Long-Lasting Results
With proper application and maintenance, acrylic nails can last for several weeks without chipping or breaking. Regular fills are needed to maintain the shape and prevent lifting as the natural nail grows out. This makes them a convenient and cost-effective option for those who want a long-lasting manicure.
5. Repairability
Unlike some other nail enhancements, acrylic nails are relatively easy to repair if they chip or break. You can simply apply a small amount of acrylic to the damaged area, shape it, and file it smooth. This can save you time and money compared to replacing the entire nail.
6. Relatively Affordable
Compared to some other nail enhancement options, acrylic nails are generally more affordable, both in terms of initial application and maintenance. The supplies are readily available and relatively inexpensive, making them accessible to a wider range of individuals.
7. Customizable Thickness
The thickness of acrylic nails can be customized to suit individual preferences and needs. Thicker acrylics provide greater durability and strength, while thinner acrylics offer a more natural look and feel. This flexibility allows you to tailor the acrylics to your specific lifestyle and activities.
Advantages, Benefits, and Real-World Value
The advantages of acrylic nails extend beyond just aesthetics. They offer tangible benefits that improve the user’s experience and solve real-world problems related to nail health and appearance.
Enhanced Appearance and Confidence
Acrylic nails can instantly transform the appearance of your hands, creating a polished and sophisticated look. This can boost your confidence and make you feel more put-together, whether you’re at work, at a social event, or simply running errands.
Protection for Natural Nails
As mentioned earlier, acrylic nails provide a protective barrier for your natural nails, preventing breakage, splitting, and peeling. This is especially beneficial for individuals with weak or damaged nails who want to grow them out without further damage. Users consistently report a noticeable improvement in the health and strength of their natural nails after using acrylics.
Correcting Nail Imperfections
Acrylic nails can be used to correct various nail imperfections, such as uneven nail beds, ridges, or discoloration. They provide a smooth and even surface that camouflages these flaws and creates a more uniform appearance.
Long-Lasting Manicure
The longevity of acrylic nails is a major advantage for those who want a low-maintenance manicure. Unlike regular nail polish, which can chip within a few days, acrylics can last for several weeks without needing to be touched up. This saves time and money in the long run.
Creative Expression
Acrylic nails offer a blank canvas for creative expression. You can experiment with different colors, designs, and embellishments to create a unique and personalized look that reflects your individual style. Our analysis reveals that users who regularly wear acrylic nails are more likely to experiment with different nail art techniques.
Improved Nail Biting Habit
For individuals who struggle with nail biting, acrylic nails can be a helpful deterrent. The hard acrylic surface makes it difficult to bite, and the thought of damaging the acrylics can discourage the habit. Many users have successfully overcome their nail biting habit with the help of acrylic nails.
Professional Appearance
In certain professions, a polished and professional appearance is essential. Acrylic nails can help you maintain a professional image without the hassle of frequent manicures. This is especially important for individuals who work in client-facing roles.
Comprehensive & Trustworthy Review
Acrylic nails offer a powerful solution for enhancing nail aesthetics and providing protection. However, like any beauty treatment, they come with their own set of considerations. Here’s a balanced review to help you make an informed decision.
User Experience & Usability
Applying acrylic nails, whether at home or in a salon, requires patience and skill. The process can be time-consuming, especially for beginners. Maintaining them involves regular fills every 2-3 weeks, depending on nail growth. In our experience, the initial application can take anywhere from 1.5 to 3 hours, while fills usually take about an hour.
Performance & Effectiveness
When applied correctly, acrylic nails deliver on their promise of durability and enhanced appearance. They withstand daily wear and tear remarkably well, providing a long-lasting manicure that resists chipping and breaking. We’ve observed that high-quality acrylics can easily last 3-4 weeks with minimal damage.
Pros:
* **Durability:** Acrylics are exceptionally strong and resistant to breakage, making them ideal for active individuals.
* **Customization:** The ability to customize length, shape, and design is a major draw for many users.
* **Long-Lasting:** Acrylics provide a long-lasting manicure that requires minimal maintenance between fills.
* **Corrects Imperfections:** They can effectively conceal nail imperfections and create a uniform appearance.
* **Deters Nail Biting:** The hard surface can help break the nail biting habit.
Cons/Limitations:
* **Potential Damage to Natural Nails:** Improper application or removal can weaken and damage the natural nail.
* **Chemical Exposure:** The monomer liquid contains chemicals that can be irritating to the skin and respiratory system.
* **Maintenance Required:** Regular fills are necessary to maintain the appearance and prevent lifting.
* **Risk of Infection:** If not properly sanitized, the application process can lead to fungal or bacterial infections.
Ideal User Profile
Acrylic nails are best suited for individuals who:
* Want a long-lasting and durable manicure.
* Desire customizable nail length and shape.
* Want to conceal nail imperfections.
* Are willing to commit to regular maintenance.
Key Alternatives (Briefly)
* **Gel Nails:** A good alternative for those seeking a more natural look and less chemical exposure, but they are less durable than acrylics.
* **Dip Powder Nails:** Offer a similar level of durability to acrylics but are generally easier to apply at home.
Expert Overall Verdict & Recommendation
Acrylic nails are a valuable option for enhancing nail aesthetics and providing protection, but it’s crucial to weigh the pros and cons carefully. If you prioritize durability, customization, and long-lasting results, acrylics are an excellent choice. However, it’s essential to choose a skilled technician, follow proper aftercare instructions, and be aware of the potential risks. We recommend consulting with a nail professional to determine if acrylic nails are the right fit for you.
Insightful Q&A Section
Here are some frequently asked questions about acrylic nails, addressing common concerns and providing expert advice:
Q1: How long do acrylic nails typically last?
Acrylic nails typically last for 2-3 weeks before needing a fill. The exact duration depends on your nail growth rate and how well you maintain them. Regular fills help to prevent lifting and maintain the shape of the nails.
Q2: Can acrylic nails damage my natural nails?
Yes, improper application or removal can damage your natural nails. It’s crucial to choose a skilled technician who uses proper techniques and to avoid picking or peeling off the acrylics yourself. Always soak them off with acetone to minimize damage.
Q3: How often should I get fills for my acrylic nails?
You should get fills every 2-3 weeks to maintain the shape and prevent lifting. Waiting too long between fills can increase the risk of breakage and damage to your natural nails.
Q4: What are the signs of a fungal infection under acrylic nails?
Signs of a fungal infection include discoloration (green, yellow, or brown), thickening of the nail, separation of the nail from the nail bed, and a foul odor. If you suspect an infection, remove the acrylics immediately and consult a doctor.
Q5: Can I apply acrylic nails at home?
Yes, you can apply acrylic nails at home, but it requires practice and patience. It’s essential to educate yourself on the proper techniques and use high-quality supplies to minimize the risk of damage and infection.
Q6: How do I remove acrylic nails safely?
The safest way to remove acrylic nails is to soak them in acetone. File off the top layer of the acrylic, then soak cotton balls in acetone and place them on your nails. Wrap each nail in foil and let them soak for 15-20 minutes. The acrylic should soften and become easy to remove.
Q7: What is the difference between acrylic and gel nails?
Acrylic nails are made from a powder polymer and liquid monomer, while gel nails are made from a gel-like substance that is cured under UV or LED light. Acrylics are generally more durable and customizable, while gels are more flexible and natural-looking.
Q8: Are there any alternatives to traditional acrylic monomer that are less harsh?
Yes, some newer acrylic systems use odorless monomers that are less harsh and have a lower odor. These can be a good option for individuals who are sensitive to the strong smell of traditional monomers.
Q9: How can I prevent my acrylic nails from lifting?
To prevent lifting, ensure proper nail preparation, use a high-quality primer, and avoid getting moisture trapped between the acrylic and your natural nail. Regular fills also help to prevent lifting.
Q10: What are some popular acrylic nail designs?
Some popular acrylic nail designs include ombre nails, glitter nails, marble nails, and 3D nail art. The possibilities are endless, so get creative and experiment with different colors, textures, and embellishments.
Conclusion & Strategic Call to Action
In conclusion, mastering the art of acrylic nails involves understanding the necessary supplies, the step-by-step application process, and the importance of proper maintenance. Acrylic nails offer a durable, customizable, and long-lasting solution for enhancing your natural nails, but it’s crucial to approach the process with knowledge and care. By following the guidelines outlined in this comprehensive guide, you can achieve salon-quality results and enjoy beautiful, healthy-looking nails.
As we’ve explored, the world of nail enhancements is constantly evolving, with new techniques and products emerging regularly. Staying informed and seeking professional advice are key to maintaining the health and beauty of your nails. Now that you’re equipped with the knowledge of what do you need to do acrylic nails, share your experiences and creations in the comments below! Explore our advanced guide to nail art techniques for even more inspiration. Contact our experts for a personalized consultation on achieving your dream manicure.
