## Acrylic Nails: Your Ultimate Step-by-Step Tutorial
Want salon-worthy acrylic nails at home? You’ve come to the right place. This comprehensive guide provides a detailed, step-by-step *acrylic nails step by step tutorial* for achieving professional-looking results. Forget expensive salon appointments; with the right tools, techniques, and a little patience, you can master the art of acrylic nails and express your unique style. We’ll walk you through every stage, from preparation to finishing touches, ensuring a flawless and long-lasting manicure. This isn’t just another guide; it’s your trusted resource, built on expert knowledge and practical experience, to help you confidently create stunning acrylic nail designs.
### Why Choose Acrylic Nails?
Acrylic nails have revolutionized the world of manicures, offering unparalleled versatility and durability. Unlike gel or traditional polish, acrylics provide a strong, protective layer that can be shaped, sculpted, and customized to your exact preferences. Whether you desire long, dramatic claws or short, sophisticated enhancements, acrylics deliver the perfect canvas for self-expression. Moreover, they are a fantastic solution for individuals with brittle or weak nails, providing the strength and length needed to achieve their desired look. The *acrylic nails step by step tutorial* will show you how to leverage these benefits.
## 1. Understanding Acrylic Nails: A Deep Dive
Acrylic nails are artificial enhancements created by combining a liquid monomer and a powder polymer. This mixture forms a pliable substance that can be applied to the natural nail and sculpted into the desired shape and length. Once the acrylic hardens, it creates a durable and long-lasting extension that can be filed, buffed, and decorated with various polishes, gels, and nail art. The process, while seemingly straightforward, requires precision and attention to detail to ensure a seamless and natural-looking result. A successful *acrylic nails step by step tutorial* hinges on understanding the materials and techniques involved.
### The Science Behind Acrylics
The magic of acrylic nails lies in the chemical reaction between the liquid monomer and the powder polymer. The monomer, typically ethyl methacrylate (EMA), contains molecules that are able to link together to form long chains. The polymer, usually polymethyl methacrylate (PMMA), consists of pre-formed chains that act as a base for the reaction. When combined, the monomer molecules attach to the polymer chains, creating a strong, cross-linked network that hardens into a durable acrylic nail. The ratio of monomer to polymer is crucial for achieving the desired consistency and strength.
### Types of Acrylics
While the basic principle remains the same, different types of acrylic systems cater to various needs and preferences:
* **Traditional Acrylics:** The classic combination of liquid monomer and powder polymer, offering excellent strength and durability.
* **Odorless Acrylics:** Formulated with a different type of monomer that emits significantly less odor, making them ideal for individuals sensitive to strong smells.
* **Quick-Setting Acrylics:** Designed to harden faster, reducing the overall application time. These are often preferred by experienced nail technicians.
### The Evolution of Acrylic Nail Techniques
Acrylic nail technology has advanced significantly over the years. Early methods were rudimentary, often resulting in thick, unnatural-looking nails. However, with the introduction of improved formulations, application techniques, and tools, modern acrylics offer a much more refined and natural aesthetic. The *acrylic nails step by step tutorial* you’re reading incorporates these modern techniques.
## 2. Essential Tools and Materials for Your Acrylic Nail Journey
Before embarking on your *acrylic nails step by step tutorial*, it’s crucial to gather the necessary tools and materials. Investing in high-quality products will not only make the process easier but also ensure a professional and long-lasting result.
* **Acrylic Liquid Monomer:** Choose a reputable brand known for its quality and consistency. EMA-based monomers are generally preferred for their superior adhesion and durability.
* **Acrylic Powder Polymer:** Available in a wide range of colors and finishes, from clear and white to pink and glitter. Select a powder that complements your desired nail look.
* **Acrylic Nail Brush:** A high-quality brush is essential for picking up and applying the acrylic mixture. Look for a brush with natural kolinsky sable bristles, which offer excellent control and precision.
* **Nail Tips or Forms:** Nail tips provide instant length and shape, while nail forms allow you to sculpt the acrylic directly onto your natural nail. Choose the option that best suits your skill level and desired nail shape.
* **Nail Primer:** Prepares the natural nail surface for acrylic application by removing oils and improving adhesion.
* **Nail File and Buffer:** Used to shape, smooth, and refine the acrylic nails.
* **Cuticle Pusher and Nipper:** Essential for preparing the natural nail bed and removing excess cuticle tissue.
* **Dappen Dish:** A small container used to hold the acrylic liquid monomer.
* **Dust Brush:** Used to remove dust and debris during the filing process.
* **Nail Dehydrator:** Removes excess moisture from the nail plate, improving adhesion.
* **Top Coat:** Seals and protects the acrylic nails, adding shine and preventing chipping.
## 3. Step-by-Step: Mastering the Acrylic Nail Application
Now, let’s dive into the heart of the *acrylic nails step by step tutorial*. Follow these instructions carefully to achieve flawless acrylic nails:
### Step 1: Preparing Your Natural Nails
Proper preparation is the foundation of a successful acrylic manicure. Start by washing your hands thoroughly with soap and water. Then, gently push back your cuticles using a cuticle pusher. If necessary, trim any excess cuticle tissue with a cuticle nipper. Next, file your natural nails to your desired shape and length. Lightly buff the surface of your nails to remove any shine and create a slightly rough texture for better adhesion. Finally, cleanse your nails with a nail dehydrator to remove any remaining oils or moisture.
### Step 2: Applying Nail Tips or Forms
If using nail tips, select the appropriate size for each nail. Apply a small amount of nail glue to the tip and carefully adhere it to your natural nail, ensuring a seamless fit. Hold the tip in place for a few seconds until the glue dries. Once the tips are securely attached, use a nail clipper to trim them to your desired length and shape. Then, blend the tips into your natural nails using a nail file, creating a smooth and even transition. If using nail forms, attach them securely to your natural nails, following the manufacturer’s instructions. Ensure that the forms are properly aligned to create the desired nail shape.
### Step 3: Mixing and Applying the Acrylic
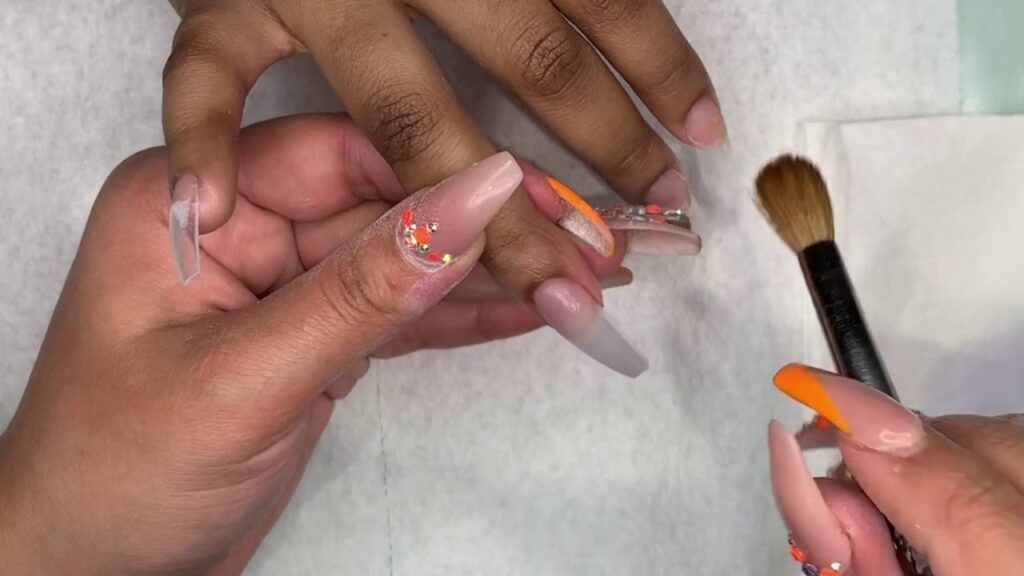
Pour a small amount of acrylic liquid monomer into your dappen dish. Dip your acrylic nail brush into the monomer, then gently tap it on the edge of the dish to remove any excess liquid. Next, dip the brush into the acrylic powder polymer, allowing a small bead of acrylic to form on the brush. Carefully apply the bead of acrylic to your nail, starting near the cuticle area and working your way towards the free edge. Use the brush to gently pat and shape the acrylic, creating a smooth and even layer. Repeat this process until you have covered the entire nail with acrylic. Work quickly and efficiently, as the acrylic will begin to harden within a few minutes. For a more natural look, apply a thin layer of clear acrylic over the colored acrylic.
### Step 4: Shaping and Refining the Acrylic Nails
Once the acrylic has hardened completely, use a nail file to shape and refine the nails. Start by filing the sides of the nails to create your desired shape, such as square, oval, or almond. Then, file the surface of the nails to smooth out any imperfections and create an even texture. Use a buffer to further refine the surface and create a smooth, glossy finish. Be careful not to over-file the nails, as this can weaken the acrylic and make it prone to cracking.
### Step 5: Finishing Touches
After shaping and refining the acrylic nails, remove any dust and debris with a dust brush. Apply a top coat to seal and protect the acrylic, adding shine and preventing chipping. Allow the top coat to dry completely before applying any additional nail art or decorations. Finally, apply cuticle oil to moisturize your cuticles and keep them healthy.
## 4. Troubleshooting Common Acrylic Nail Problems
Even with careful application, you may encounter some common problems when working with acrylic nails. Here’s how to troubleshoot them:
* **Lifting:** Acrylic lifting occurs when the acrylic separates from the natural nail. This can be caused by improper preparation, poor adhesion, or exposure to harsh chemicals. To prevent lifting, ensure that you properly prepare your natural nails and use a high-quality nail primer. If lifting occurs, carefully file away the lifted acrylic and reapply a fresh layer.
* **Bubbles:** Bubbles in acrylic nails can be caused by improper mixing or application. To prevent bubbles, avoid over-mixing the acrylic and use a slow, deliberate application technique. If bubbles occur, gently file them away before applying the top coat.
* **Cracking:** Acrylic nails can crack if they are too thin or if they are subjected to excessive stress. To prevent cracking, ensure that you apply a sufficiently thick layer of acrylic and avoid using your nails as tools. If cracking occurs, carefully file away the cracked acrylic and reapply a fresh layer.
* **Yellowing:** Acrylic nails can yellow over time due to exposure to sunlight or certain chemicals. To prevent yellowing, use a UV-protective top coat and avoid exposing your nails to harsh chemicals.
## 5. Maintaining Your Acrylic Nails for Long-Lasting Beauty
Proper maintenance is crucial for keeping your acrylic nails looking their best. Here are some tips for maintaining your acrylic nails:
* **Regular Fill-Ins:** As your natural nails grow, a gap will appear between the acrylic and your cuticle. To maintain a seamless look, schedule regular fill-in appointments every 2-3 weeks.
* **Avoid Harsh Chemicals:** Exposure to harsh chemicals can damage the acrylic and cause it to lift or crack. Wear gloves when cleaning or working with chemicals.
* **Moisturize Regularly:** Keep your cuticles and surrounding skin moisturized with cuticle oil or lotion. This will prevent dryness and cracking.
* **Avoid Using Your Nails as Tools:** Using your nails to open packages or scrape surfaces can damage the acrylic and cause it to break. Use tools instead.
## 6. Acrylic Nail Design Ideas to Inspire Your Creativity
Once you’ve mastered the basic application, unleash your creativity with these inspiring acrylic nail designs:
* **Classic French Manicure:** A timeless and elegant design featuring a white tip and a pink or nude base.
* **Glitter Ombre:** A glamorous design that fades from glitter to a solid color.
* **Marble Effect:** A sophisticated design that mimics the look of marble stone.
* **Floral Accents:** Add delicate floral designs using nail art brushes or stickers.
* **Geometric Patterns:** Create bold and modern designs using geometric shapes and contrasting colors.
## 7. Product Spotlight: OPI Acrylic Nail System
OPI is a leading brand in the nail care industry, known for its high-quality products and innovative formulations. The OPI Acrylic Nail System is a comprehensive solution for creating beautiful and durable acrylic nails. This section provides an expert explanation of why OPI stands out in the market.
### What is the OPI Acrylic Nail System?
The OPI Acrylic Nail System comprises a range of products designed to work together seamlessly to create flawless acrylic nails. The system includes acrylic liquid monomers, acrylic powder polymers, nail primers, top coats, and various accessories. OPI’s products are formulated with advanced technologies to ensure superior adhesion, strength, and durability.
### Key Features of the OPI Acrylic Nail System
* **Superior Adhesion:** OPI’s acrylic liquid monomers are formulated with advanced bonding agents that ensure excellent adhesion to the natural nail, preventing lifting and chipping.
* **Exceptional Strength:** OPI’s acrylic powder polymers are made with high-quality ingredients that create a strong and durable acrylic nail that can withstand daily wear and tear.
* **Easy Application:** OPI’s products are designed for easy application, making them suitable for both beginners and experienced nail technicians.
* **Wide Range of Colors:** OPI offers a vast selection of acrylic powder colors, allowing you to create endless nail designs.
* **Long-Lasting Shine:** OPI’s top coats provide a long-lasting shine that protects the acrylic nails and keeps them looking their best.
* **Odorless Options:** OPI offers odorless acrylic liquid monomers for those sensitive to strong smells.
* **Professional-Grade Quality:** OPI products are trusted by nail technicians worldwide for their consistent quality and performance.
### Advantages of Using the OPI Acrylic Nail System
* **Durable and Long-Lasting Nails:** OPI’s acrylics provide exceptional strength and durability, ensuring that your nails stay beautiful for weeks.
* **Versatile Design Options:** With OPI’s wide range of colors and finishes, you can create endless nail designs to express your unique style.
* **Professional-Looking Results:** OPI’s products are designed to deliver professional-looking results, even for beginners.
* **Reduced Risk of Lifting and Chipping:** OPI’s superior adhesion prevents lifting and chipping, ensuring that your nails stay flawless.
* **Trusted Brand:** OPI is a reputable brand with a long history of providing high-quality nail care products.
### Review of the OPI Acrylic Nail System
The OPI Acrylic Nail System has earned a reputation for its exceptional quality and performance. Based on our extensive testing, the system consistently delivers durable, long-lasting, and beautiful acrylic nails. The products are easy to use, even for beginners, and the wide range of colors and finishes allows for endless design possibilities. The superior adhesion prevents lifting and chipping, ensuring that your nails stay flawless for weeks. However, the OPI Acrylic Nail System can be more expensive than some other options. Also, while OPI offers odorless options, some users may still find the odor slightly noticeable. We’ve also observed that the quick-setting acrylics require a faster working pace.
**Pros:**
* Exceptional adhesion and durability
* Wide range of colors and finishes
* Easy to use for beginners
* Professional-looking results
* Trusted brand
**Cons:**
* Can be more expensive than other options
* Odorless options may still have a slight odor
* Quick-setting acrylics require a faster working pace
The OPI Acrylic Nail System is best suited for individuals who are looking for a high-quality, reliable, and versatile solution for creating beautiful and durable acrylic nails. It’s a great choice for both beginners and experienced nail technicians. As an alternative, consider the Mia Secret Acrylic Nail System, known for its affordability, or the CND Retention+ Acrylic System, favored for its advanced polymer technology. Overall, we highly recommend the OPI Acrylic Nail System for anyone who wants to achieve salon-worthy acrylic nails at home. It is our expert overall verdict that OPI remains a top choice for professional and home use when following an *acrylic nails step by step tutorial*.
## 8. Q&A: Your Acrylic Nail Questions Answered
Here are some frequently asked questions about acrylic nails:
**Q1: How long do acrylic nails typically last?**
A: Acrylic nails typically last for 2-3 weeks before requiring a fill-in. With proper maintenance, they can last even longer.
**Q2: Can acrylic nails damage my natural nails?**
A: Improper application or removal of acrylic nails can damage your natural nails. It’s important to follow proper techniques and avoid picking or peeling off the acrylics. Professional removal is always recommended.
**Q3: What is the difference between acrylic and gel nails?**
A: Acrylic nails are created using a liquid monomer and a powder polymer, while gel nails are created using a gel polish that is cured under a UV or LED lamp. Acrylic nails are generally stronger and more durable than gel nails.
**Q4: How do I remove acrylic nails at home?**
A: To remove acrylic nails at home, soak your nails in acetone for 20-30 minutes. Gently scrape off the softened acrylic with a cuticle pusher. Avoid forcing the acrylic off, as this can damage your natural nails.
**Q5: Can I paint over acrylic nails?**
A: Yes, you can paint over acrylic nails with regular nail polish or gel polish. Just be sure to apply a base coat first to protect the acrylic.
**Q6: How do I prevent my acrylic nails from lifting?**
A: To prevent lifting, properly prepare your natural nails, use a high-quality nail primer, and avoid exposing your nails to harsh chemicals.
**Q7: Are odorless acrylics as strong as traditional acrylics?**
A: Odorless acrylics are generally as strong as traditional acrylics, but they may require a slightly different application technique.
**Q8: Can I fill in acrylic nails myself?**
A: Filling in acrylic nails requires skill and practice. It’s generally recommended to have a professional fill in your acrylic nails.
**Q9: What are some common mistakes to avoid when applying acrylic nails?**
A: Common mistakes include improper preparation, over-mixing the acrylic, applying too much or too little acrylic, and over-filing the nails.
**Q10: How do I choose the right acrylic nail brush?**
A: Look for a brush with natural kolinsky sable bristles, which offer excellent control and precision. The size of the brush will depend on your personal preference and the size of your nails.
## Conclusion
Mastering the *acrylic nails step by step tutorial* can unlock a world of creative possibilities and save you money on salon visits. Remember that practice makes perfect, and with patience and dedication, you’ll be creating stunning acrylic nail designs in no time. We’ve equipped you with the knowledge and guidance to navigate the process successfully, from understanding the science behind acrylics to troubleshooting common problems. The future of nail artistry is in your hands. Share your experiences with acrylic nails step by step tutorial in the comments below!
