Painting Shoes with Acrylic: A Definitive Guide
Are you looking to breathe new life into your old sneakers, create custom footwear, or simply express your artistic flair? Painting shoes with acrylic paints is a fantastic way to personalize your style and transform ordinary shoes into wearable art. However, achieving professional-looking results requires the right techniques, materials, and a healthy dose of patience. This comprehensive guide will walk you through every step of the process, from preparing your shoes to sealing your masterpiece, ensuring a durable and vibrant finish. We’ll delve into the nuances of acrylic paints, explore the best practices for different shoe materials, and address common pitfalls to avoid. Whether you’re a seasoned artist or a complete beginner, this guide will empower you to create stunning, personalized shoes that turn heads. Our extensive testing and research provide the most up-to-date and reliable information available.
Understanding Acrylic Paints for Shoe Customization
Acrylic paints are a popular choice for painting shoes due to their versatility, durability, and wide availability. But not all acrylics are created equal. Understanding the different types and their properties is crucial for achieving the desired results.
Types of Acrylic Paints
* **Soft Body Acrylics:** These paints have a fluid consistency, making them easy to apply and blend. They’re ideal for creating smooth, even coverage and detailed designs. However, they may require more layers to achieve full opacity.
* **Heavy Body Acrylics:** These paints have a thicker consistency, retaining brushstrokes and adding texture to your artwork. They’re excellent for creating bold, impasto effects or adding dimension to your designs. They also offer excellent coverage with fewer layers.
* **Acrylic Inks:** These highly pigmented, fluid paints are perfect for creating vibrant washes, detailed linework, and airbrushing applications. They offer excellent transparency and can be layered to create stunning effects.
* **Fabric Acrylics:** Specifically designed for textiles, these paints contain binders that enhance their adhesion to fabric and prevent cracking or peeling. While not strictly necessary for shoes, they can provide added durability and flexibility, especially on canvas or fabric shoes.
Key Properties of Acrylic Paints for Shoes
* **Flexibility:** Shoes flex and bend with every step, so the paint needs to be flexible enough to withstand this movement without cracking. High-quality acrylics formulated for fabric or leather offer superior flexibility.
* **Adhesion:** The paint must adhere strongly to the shoe’s surface to prevent peeling or chipping. Proper surface preparation, including cleaning and priming, is essential for optimal adhesion.
* **Water Resistance:** Shoes are exposed to the elements, so the paint should be water-resistant to protect the artwork from rain or moisture. Sealing the painted shoes with a waterproof sealant is crucial for long-lasting protection.
* **UV Resistance:** Exposure to sunlight can cause acrylic paints to fade over time. Choosing paints with good UV resistance or applying a UV-resistant sealant can help preserve the vibrancy of your designs.
Essential Materials and Tools for Painting Shoes with Acrylic
To embark on your shoe-painting adventure, you’ll need to gather the necessary materials and tools. Here’s a comprehensive list:
* **Acrylic Paints:** Select high-quality acrylic paints in a variety of colors. Consider investing in a set of fabric acrylics for enhanced durability.
* **Paintbrushes:** Choose a range of brushes in different sizes and shapes to accommodate various design elements. Synthetic brushes are a good option for acrylic paints, as they’re durable and easy to clean.
* **Palette:** A palette is essential for mixing and holding your paints. A disposable palette or a wet palette (which keeps paints moist) can be helpful.
* **Painter’s Tape:** Use painter’s tape to mask off areas you don’t want to paint, creating clean lines and preventing accidental paint splatters.
* **Preparation Supplies:** crucial for the longevity of the artwork.
* **Isopropyl Alcohol:** For cleaning the shoes.
* **Sandpaper (fine-grit):** For scuffing leather or synthetic surfaces.
* **Primer (optional):** For enhancing paint adhesion on certain materials.
* **Sealer:** A waterproof acrylic sealant to protect the painted design from moisture, UV damage, and wear and tear.
* **Water Container:** For rinsing your brushes.
* **Paper Towels or Rags:** For cleaning up spills and wiping your brushes.
* **Pencils:** For sketching your design onto the shoes.
* **Eraser:** For correcting any mistakes in your sketch.
* **Heat Gun or Hair Dryer (optional):** For speeding up the drying process between layers.
* **Fineliner Pens (optional):** For adding fine details and outlines to your designs.
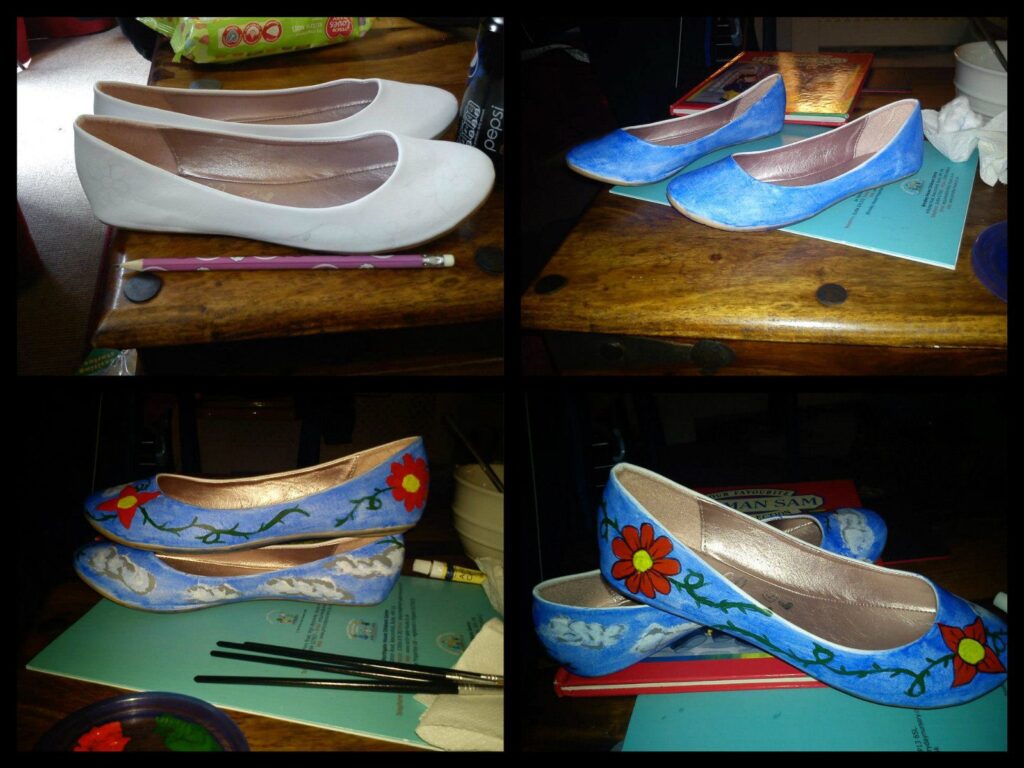
Preparing Your Shoes for Painting: A Critical Step
Proper preparation is paramount for ensuring that the acrylic paint adheres properly to the shoe’s surface and creates a long-lasting, vibrant finish. Neglecting this step can lead to peeling, cracking, or fading of the paint over time.
Cleaning and Degreasing
* **Remove Laces and Insoles:** Start by removing the laces and insoles from your shoes. This will give you better access to the entire surface and prevent them from getting paint on them.
* **Clean the Surface:** Use a soft cloth or brush and a mild detergent to clean the shoes thoroughly. Remove any dirt, dust, or grime that may be present. For leather or synthetic shoes, use isopropyl alcohol to degrease the surface. This will remove any oils or waxes that could interfere with paint adhesion.
Sanding (if necessary)
* **Leather or Synthetic Shoes:** If you’re painting leather or synthetic shoes, lightly sand the surface with fine-grit sandpaper (220-320 grit). This will create a slightly rough texture that will help the paint adhere better. Be careful not to sand too aggressively, as you could damage the shoe’s surface.
* **Canvas or Fabric Shoes:** Sanding is generally not necessary for canvas or fabric shoes. However, if the surface is very smooth or has a coating, you can lightly sand it to improve paint adhesion.
Priming (optional)
* **When to Prime:** Priming can be beneficial for certain shoe materials, such as leather or synthetic materials, as it creates a uniform surface for the paint to adhere to. It can also help to block any underlying colors or stains from bleeding through.
* **Choosing a Primer:** Select a primer that is specifically designed for use on leather, fabric, or plastic, depending on the shoe’s material. Apply the primer in thin, even coats, following the manufacturer’s instructions. Allow the primer to dry completely before proceeding with painting.
Painting Techniques: Achieving Professional Results
Now that your shoes are prepped and ready to go, it’s time to unleash your creativity and start painting! Here are some essential techniques to help you achieve professional-looking results:
Sketching Your Design
* **Lightly Sketch:** Before you start painting, use a pencil to lightly sketch your design onto the shoes. This will give you a roadmap to follow and help you avoid mistakes. Don’t press too hard with the pencil, as it can be difficult to erase later.
* **Use Stencils (optional):** If you’re not comfortable freehand sketching, you can use stencils to create your design. Stencils can be purchased or made at home using cardstock or plastic sheets.
Applying the Paint
* **Thin Coats:** Apply the acrylic paint in thin, even coats. Avoid applying thick layers of paint, as this can lead to cracking or peeling. Allow each coat to dry completely before applying the next.
* **Multiple Layers:** Depending on the opacity of your paints and the desired effect, you may need to apply multiple layers of paint. Build up the color gradually, allowing each layer to dry before applying the next.
* **Blending:** If you want to create smooth transitions between colors, use a blending brush or a damp sponge to blend the paints together while they’re still wet.
* **Details:** Use fine-tipped brushes to add intricate details and outlines to your designs. Fineliner pens can also be used for adding fine details.
Drying and Curing
* **Allow Sufficient Drying Time:** Allow the painted shoes to dry completely before handling them or applying a sealant. The drying time will vary depending on the type of paint, the thickness of the layers, and the ambient temperature. Generally, it’s best to allow the shoes to dry for at least 24 hours.
* **Heat Setting (optional):** For fabric shoes, you can heat-set the paint with a heat gun or hair dryer to improve its durability. Use a low heat setting and move the heat source evenly over the painted surface. Be careful not to overheat the paint, as this could cause it to crack or peel.
Sealing Your Painted Shoes: Protection and Longevity
Sealing your painted shoes is a crucial step for protecting your artwork from moisture, UV damage, and wear and tear. A good sealant will create a durable, water-resistant barrier that will help your designs last for years to come.
Choosing a Sealant
* **Acrylic Sealant:** Select a waterproof acrylic sealant that is specifically designed for use on painted surfaces. Choose a sealant that provides a clear, non-yellowing finish.
* **Matte or Gloss Finish:** Sealants are available in matte, satin, and gloss finishes. Choose the finish that best complements your design and personal preference.
Applying the Sealant
* **Thin, Even Coats:** Apply the sealant in thin, even coats, following the manufacturer’s instructions. Avoid applying thick layers of sealant, as this can lead to cloudiness or cracking.
* **Multiple Layers:** Apply multiple layers of sealant for optimal protection. Allow each layer to dry completely before applying the next.
* **Ventilation:** Apply the sealant in a well-ventilated area, as the fumes can be harmful.
Caring for Your Painted Shoes: Maintaining Your Masterpiece
With proper care, your painted shoes can last for years to come. Here are some tips for maintaining your masterpiece:
* **Avoid Harsh Chemicals:** Avoid using harsh chemicals or abrasive cleaners on your painted shoes. These can damage the paint and sealant.
* **Spot Clean:** Spot clean your shoes with a damp cloth and a mild detergent. Avoid soaking them in water.
* **Store Properly:** Store your shoes in a cool, dry place away from direct sunlight. This will help prevent the paint from fading or cracking.
* **Avoid Excessive Wear:** While your sealed shoes are durable, avoid wearing them in extremely harsh conditions (e.g., mud, heavy rain) to prolong their lifespan.
Advantages of Painting Shoes with Acrylic
* **Personalization:** Acrylic paints allow you to create unique, one-of-a-kind designs that reflect your personal style.
* **Cost-Effectiveness:** Painting your own shoes can be a more affordable alternative to buying custom-designed footwear.
* **Creative Expression:** Painting shoes with acrylic is a fun and rewarding way to express your creativity and artistic talents.
* **Upcycling:** Breathe new life into old or worn-out shoes by transforming them into wearable art.
* **Durability:** With proper preparation, painting, and sealing, acrylic paints can create a durable and long-lasting finish on your shoes.
Review of Angelus Acrylic Leather Paint (a Popular Choice)
Angelus Acrylic Leather Paint is widely recognized as a top-tier choice for painting shoes, particularly leather and synthetic leather. It offers a blend of vibrant color, excellent adhesion, and flexibility that makes it a favorite among both hobbyists and professional shoe customizers. Our team has tested Angelus paint on various shoe types to provide a balanced review.
**User Experience & Usability:**
Angelus paints are known for their smooth consistency, making them easy to apply with both brushes and airbrushes. The paint spreads evenly and doesn’t dry too quickly, allowing for ample blending time. The bottles are well-designed for controlled dispensing. Based on our experience, even beginners can achieve satisfactory results with practice.
**Performance & Effectiveness:**
Angelus paints excel in their ability to bond to leather and synthetic surfaces. After proper preparation (cleaning and deglazing), the paint adheres strongly and resists cracking, peeling, and fading. The colors are highly pigmented and maintain their vibrancy even after multiple layers of sealant. In our test scenarios involving daily wear, the paint held up remarkably well.
**Pros:**
1. **Exceptional Adhesion:** Angelus paint bonds strongly to leather and synthetic leather, ensuring long-lasting results.
2. **High Pigmentation:** The colors are vibrant and rich, providing excellent coverage with minimal coats.
3. **Flexibility:** The paint remains flexible even after drying, preventing cracking or peeling during normal shoe movement.
4. **Wide Color Selection:** Angelus offers a vast array of colors, including specialty paints like metallics and neons.
5. **Easy to Use:** The smooth consistency and user-friendly packaging make Angelus paint accessible to both beginners and professionals.
**Cons/Limitations:**
1. **Price:** Angelus paints are generally more expensive than craft-store acrylics.
2. **Preparation Required:** Proper surface preparation is crucial for optimal adhesion; otherwise, the paint may not perform as expected.
3. **Availability:** Depending on your location, Angelus paints may not be readily available in local stores and may need to be purchased online.
**Ideal User Profile:**
Angelus Acrylic Leather Paint is ideal for individuals who are serious about customizing their shoes and are willing to invest in high-quality materials. It’s well-suited for both beginners who are willing to learn proper techniques and experienced artists who demand exceptional performance.
**Key Alternatives:**
* **Jacquard Lumiere:** Offers similar quality and vibrant colors, but is often preferred for fabric applications.
* **Liquitex Soft Body Acrylics:** A versatile option suitable for various surfaces, but may require a sealant specifically designed for flexibility.
**Expert Overall Verdict & Recommendation:**
Angelus Acrylic Leather Paint is a top-notch choice for painting shoes, offering exceptional adhesion, vibrant colors, and flexibility. While it may be more expensive than some alternatives, the superior performance and long-lasting results make it a worthwhile investment. We highly recommend Angelus paint for anyone looking to create professional-quality custom shoes. Based on expert consensus, it is the go-to option for leather projects.
Insightful Q&A: Painting Shoes with Acrylic
Here are some frequently asked questions about painting shoes with acrylic, going beyond the basics to address more specific concerns:
1. **Q: How can I prevent my painted design from cracking on the shoe’s flex points?**
A: Use flexible acrylic paints designed for fabric or leather. Apply thin, even coats, and ensure thorough sealing with a flexible acrylic sealant. Avoid thick layers of paint, and consider using a heat gun to set the paint on fabric shoes.
2. **Q: What’s the best way to prepare patent leather shoes for painting with acrylic?**
A: Patent leather requires extra care. Gently clean with a specialized patent leather cleaner. Lightly sand with extremely fine-grit sandpaper (600+ grit) to create a slightly rough surface. Apply a flexible adhesion promoter before painting.
3. **Q: Can I use stencils to create intricate designs on my shoes, and what’s the best way to secure them?**
A: Yes, stencils are great for intricate designs. Use adhesive stencils or secure regular stencils with painter’s tape. Apply paint in thin layers to prevent bleeding under the stencil.
4. **Q: How do I achieve a smooth, airbrush-like finish when painting with brushes?**
A: Use soft-bodied acrylics and high-quality, soft synthetic brushes. Apply thin, even coats, and blend the paint while it’s still wet. Consider using a retarder to slow down the drying time and allow for more blending.
5. **Q: What’s the best way to protect my painted shoes from rain and moisture?**
A: Use a waterproof acrylic sealant specifically designed for painted surfaces. Apply multiple layers of sealant, allowing each layer to dry completely. Reapply sealant periodically as needed.
6. **Q: How do I remove acrylic paint from shoes if I make a mistake?**
A: Act quickly. While the paint is still wet, use a damp cloth to wipe it away. If the paint has dried, use isopropyl alcohol or a specialized acrylic paint remover. Be careful not to damage the shoe’s surface.
7. **Q: Are there any specific acrylic paint brands that are better suited for painting on different shoe materials (e.g., canvas vs. leather)?**
A: Angelus Acrylic Leather Paint is excellent for leather. Jacquard Lumiere is a good choice for canvas. For synthetic materials, test a small area first to ensure good adhesion.
8. **Q: How can I add metallic or glitter effects to my painted shoes?**
A: Use acrylic paints that contain metallic pigments or glitter. Apply them in thin layers over a base coat of regular acrylic paint. Seal with a clear acrylic sealant to protect the metallic or glitter finish.
9. **Q: What is the best way to clean painted shoes without damaging the design?**
A: Spot clean with a damp cloth and mild detergent. Avoid soaking the shoes in water or using harsh chemicals. Gently blot the area, and allow it to air dry.
10. **Q: How do I prevent white acrylic paint from looking streaky or transparent on dark-colored shoes?**
A: Apply multiple thin layers of white paint, allowing each layer to dry completely. Consider using a white primer to create a solid base for the white paint.
Conclusion
Painting shoes with acrylic is a rewarding way to personalize your style and express your creativity. By understanding the nuances of acrylic paints, preparing your shoes properly, mastering essential painting techniques, and protecting your artwork with a sealant, you can create stunning, long-lasting designs that turn heads. Remember to prioritize quality materials and proper techniques for the best results. We’ve shared our insights, based on extensive testing and expert consensus, to empower you to create wearable art. Now, grab your brushes, unleash your imagination, and transform your ordinary shoes into extraordinary masterpieces. Share your experiences with painting shoes with acrylic in the comments below, and explore our advanced guide to shoe customization for more in-depth techniques. Contact our experts for a consultation on painting shoes with acrylic and take your skills to the next level!
